Do you want to draw but lack the natural artistic capabilities? Stable Diffusion is here to help! Stable Diffusion img2img feature can amazingly turn your hand drawn sketches into professional work of art leaving the viewers astonished.
Stable Diffusion is popular text-to-image AI model which comes with a list of amazing features setting it apart from other AI models. One of these features is Stable Diffusion img2img (image-to-image). Further in this article, we will discuss this feature in details. We will see how it works, it’s benefits and more. So let’s dive in!
What is Stable Diffusion img2img Feature?
Stable Diffusion img2img (image-to-image) is a feature which allows you to provide an image as input along with a text command. This input image works as a guide for the output, accompanying the text command. Stable Diffusion only follows the style, color, and composition from input image.
How does Stable Diffusion img2img Feature work?
Stable Diffusion img2img feature takes image as input along with text command, and generates a result combining both inputs. Even if your input lacks vibrancy and details, Stable Diffusion can enhance it to produce amazing results aligning with the text command you provided.
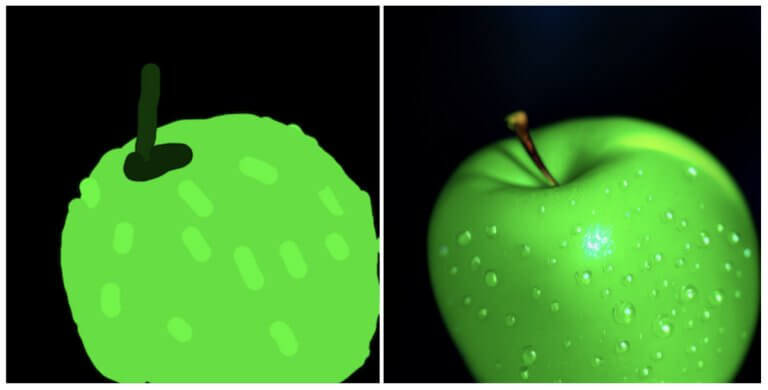
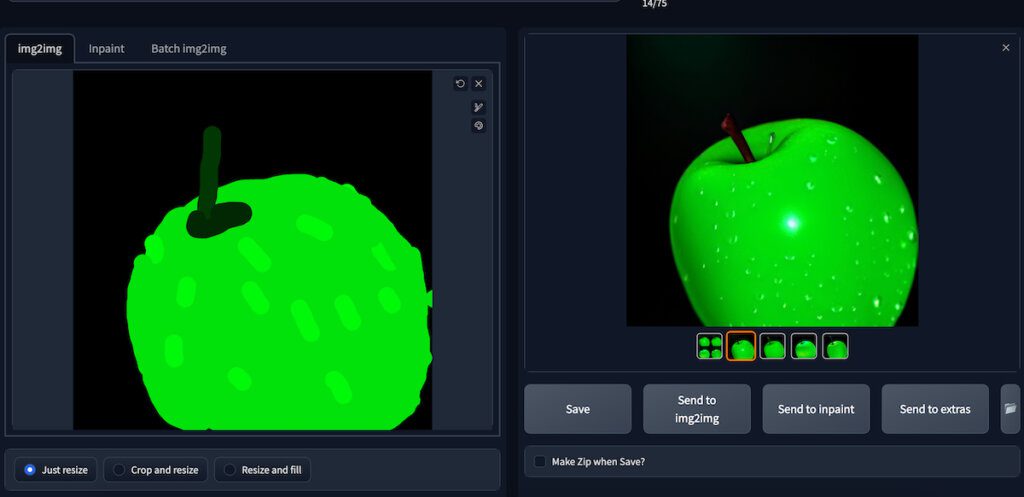
We will use a rough hand drawn sketch of an apple in this blog as an example. We will discover how, along with a text command, we can use the following image as our input (the right one). And how it can turn out to be a perfect drawing (the left one).
Setting up Stable Diffusion img2img Feature
To use Stable Diffusion img2img, you will need to install Stable Diffusion GUI called Automatic1111. Follow this step by step guide on how to install Stable Diffusion GUI on your machine.
Enabling Color Sketch Tool
Once you have installed Stable Diffusion GUI, you will have to enable color sketch tool for the better working of Stable Diffusion img2img feature. By default, the color sketch tool is inactive. However, you can active it by following these steps.
- Go to the location where you installed Automatic1111.
- Head to “stable-diffusion-webui-folder”
- Locate “webui-user.bat” file
- Right click on the file and click “Edit”.
- Now change the following line
set COMMANDLINE_ARGS=
to
set COMMANDLINE_ARGS=--gradio-img2img-tool color-sketch
- If any argument already exists after the equal sign, add
--gradio-img2img-tool color-sketchwith a space in the beginning.
Double click the file to start the GUI.
Using Color Sketch Tool
To use color sketch tool, head to img2img tab. Set up the starting image on the canvas. Select color palette icon and then solid color button. You should see the color sketch tool as demonstrated below.
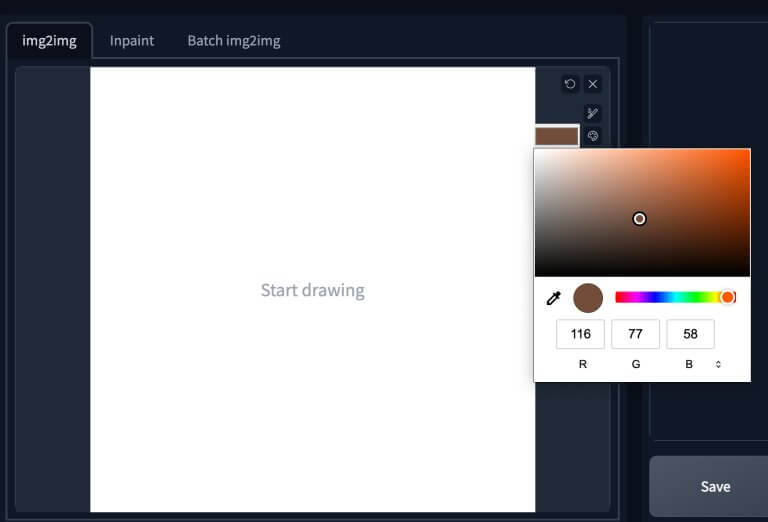
Now you are free to draw anything you want!
Transforming a Rough Drawing in to Professional Image
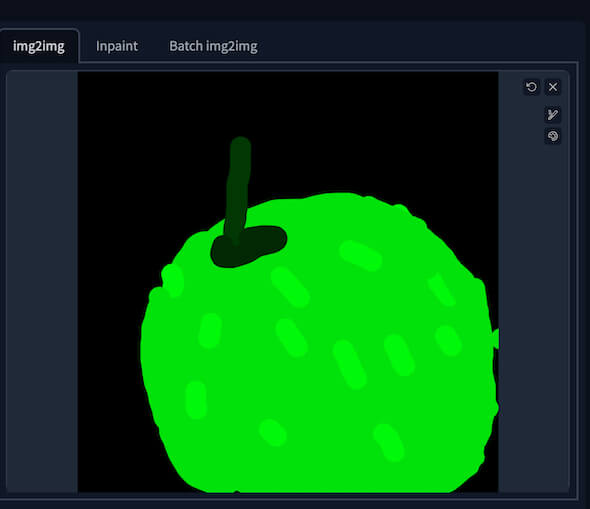
We will be using an apple as a subject to transform a rough hand drawn image to a professional drawing. You need to follow these simple steps to go along.
1. Creating a Background
You can use a canvas of 512×512 pixels with either a white or black background as per your satisfaction.
2. Draw Your Subject
Now draw your subject in the canvas. We will be using an apple as a subject. Please note you don’t need to spend too much time drawing the subject. The main focus here is to provide Stable Diffusion img2img feature the colors and composition of the subject for the reference. Rest is up to Stable Diffusion. We draw something like this.
3. Stable Diffusion img2img Feature
For Stable Diffusion v1.5 Model, select v1-5-pruned-emaonly.ckpt in checkpoint dropbox. You can also play around with other models.
Next up, you need to provide a prompt that best describes your imagination of the final image as accurately as possible. Here is the sample prompt used in our demonstration.
photo of perfect green apple with stem, water droplets, dramatic lighting
Then, use the settings demonstrated below.
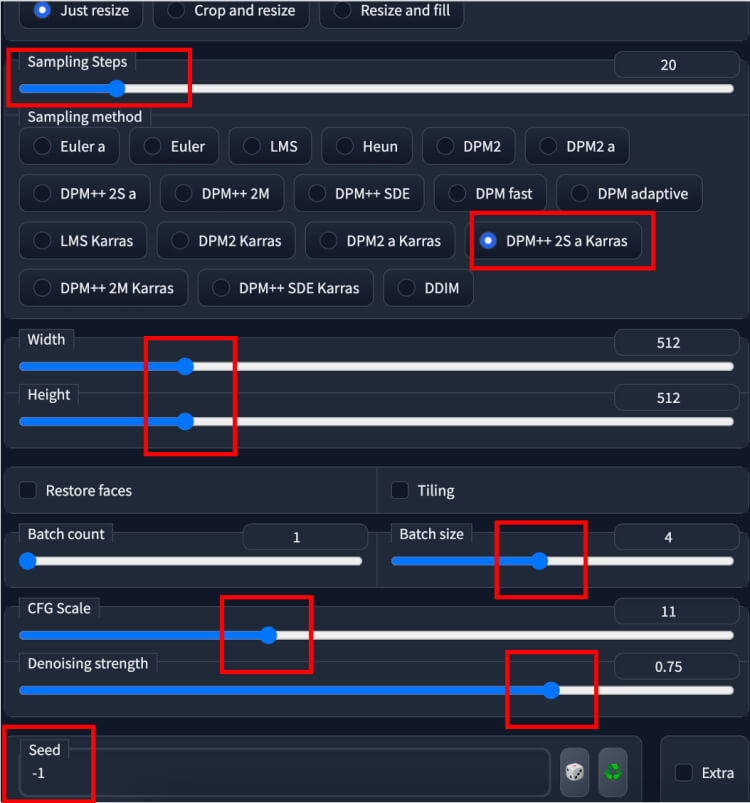
The two parameters you can play around are CFG Scale and Denoising strength. Getting started, set CFG scale to 11 and Denoising strength to 0.75.
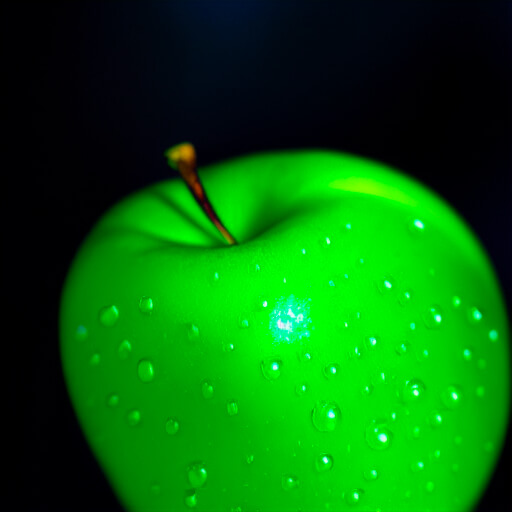
Now, hit Generate to get the results. Here is what we got.
You can experiment with CFC scale and Denoising strength after you have read the complete guide on CFG scale.
Once you are happy with the results you are getting, save the image.
Another round for Stable Diffusion img2img
If you are totally satisfied with your results, you can stop here. Otherwise, you can go for another round of img2img. This time, however, use the final image as your first sample and repeat the process. Here is what second round of img2img provided us as output.