Editor’s Picks

Read the best of all times blogs suggested by the editor to enhance your tech knowledge.

Fake You AI - Feature Image

How to Use Fake You AI to Clone Celebrities Voice in 2024

Ever wondered if you can clone celebrities’ voices and use them for yourself? Well, the answer is simple, Yes! You can. Fake You AI is here for help the help. Fake You has a huge collection of celebrities’ cloned voices which you can use for yourself. You can also clone your voice and use it for whatever you desire. In this article, we will talk about what is Fake You and how to use it.


What is Fake You AI?

Fake You is a very powerful text-to-speech AI tool that uses deep fake technology to clone your favorite celebrities saying anything you want. You can also clone your voice and use it however you want. It offers both text-to-speech and voice-to-voice conversion. It has an extensive library of over 2000 voices including famous characters like Spider-Man, and Sonic the Hedgehog and celebrities like Donald Trump. Fake You is available in multiple languages. This is ideal for generating voiceovers for YouTube videos, podcasts, and other audio and video content.


How does Fake You AI work?

Fake You AI uses deep learning technology, Natural Language Processing (NLP), and Advance Speech Synthesis Algorithms to generate voice clips. It is trained on hours of speech data to generate unbelievably realistic-sounding voice clips. You can input any text or voice and select one of the supported voice options like cartoon characters, celebrities, game characters, and many more.

Fake You will analyse your input text and generate a human-sounding voice of that celebrity or character you want, reading the text. It can also transform a voice input into a different voice like Barak Obama or Homer Simpson.

Also Read: How to use Google Gemini in 2024 – A Detailed Guide


Salient Features of Fake You AI

Now let’s discuss some of the features Fake You offers:

  1. It has a huge library of over 2000 voices and user can select any of them to generate a speech on that voice
  2. The voices of famous politicians, celebrities, musicians, and artists are also included in the library.
  3. It can generate very high-quality human-sounding voices.
  4. It is available in multiple languages including Italian, German, Spanish, Portuguese, and French.
  5. Users can download generated voice and can use it for personal reasons.
Fake You AI

Fake You AI Use Cases

Now let’s discuss where you can use Fake You AI

  1. This AI tool can be used to pull pranks on your friends. Generate a voice message from a celebrity voice and send them.
  2. You can use the tool to make entertaining videos of different celebrities’ voices.
  3. Content creators can use this tool to clone and add their voices to their videos if, for some reason, the original voice got corrupted.
  4. Marketing agencies can use this tool to generate voices and use them for their marketing purposes.
  5. Developers can use this tool to add voices to their games and other applications.
  6. This tool can be used for voice-over in different videos like podcasts and animations.
  7. This tool can also be helpful in language learning. You can record audio in your voice and listen to it in another language like French.

How to Use Fake You AI

Using Fake You is a piece of cake.

  • Simply head over to Fake You website
  • Click “Sign Up” on the upper right corner.
  • Enter the required information
  • Click on “Sign Up”, and you have created Fake You AI account.
  • You will see options for both text-to-speech and voice-to-voice. Choose your desired option.
  • In text-to-voice, you will find a text box. Enter the text that you want to convert into voice.
  • Select the character and click on the “Speak” button.
  • The voice will be generated in no time.
  • In voice-to-voice option, you will get 2 options. The first is to upload an audio.
  • Second record an audio.
  • You can choose your desired option.
  • After that select the character and click on the button” Speak”.
  • Your voice will be converted into the voice of the character in no time.

Pricing Models for Fake You AI

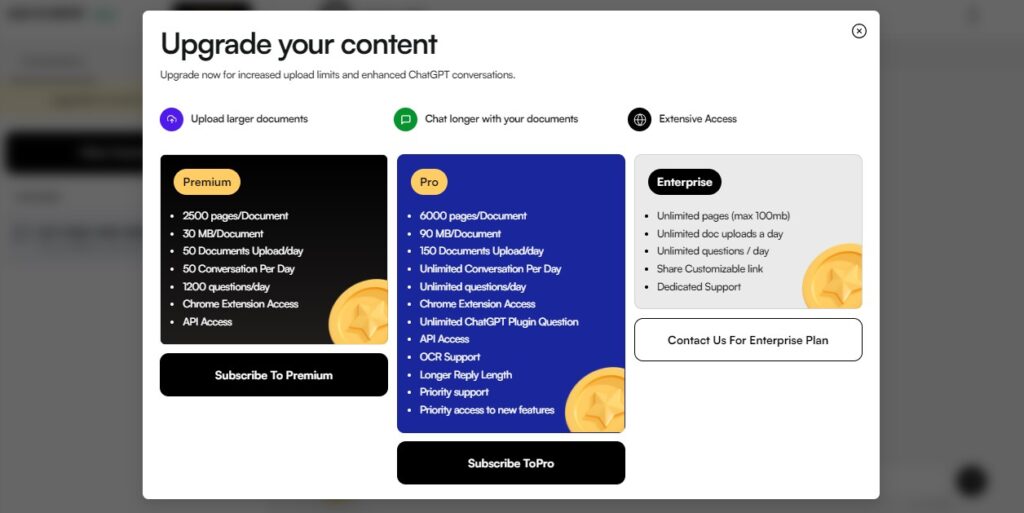
Unfortunately, unlike many other AI tools, this tool comes with no free plan. It has 3 plans and they all are paid.

  1. Plus: The Plus plan will cost you $7 per month. You will have up to 30 seconds text-to-speech generation for unlimited times and 4 minute voice-to-voice conversion and you also have to face some ads.
  2. Pro: The Pro plan will cost you $15 per month. You will have up to 1-minute text-to-speech generation for unlimited times and 5 minutes of voice-to-voice conversion. You will also get an ad-free experience.
  3. Elite: The Elite plan costs you $25 per month. You will have up to 2-minute text-to-speech generation for unlimited times and unlimited voice-to-voice conversion. And you will also get access to upcoming features like your own channel.

You can choose any of these three plans according to your requirements.

Don’t forget to check out: Conch AI – An AI Text Generator You Need in 2024


Frequently Asked Questions

  • Which celebrities’ and characters voices are available in Fake You AI?

You can choose from dozens of voices including Morgen Freeman, Barak Obama, Homer Simpsons, Spider-Man, Sonic, and many more.

  • Can I request for new voices?

Yes, you can. You just have to request on their discord server.

  • Does Fake You AI have a community?

Yes, Fake You have a very strong community. Everybody there is very helpful and supportive. If you are facing any problem, ask in the community and you will get help in no time.

  • Does Fake You AI offer an API?

Yes, it offers API to its users. You can use their API in your application or website. The price of API will be based on its usage.

Conclusion

In conclusion, Fake You is a unique and powerful AI tool that has a lot to offer to marketing agencies, content creators, and social media users. Anybody can transform a simple text into a celebrity voice. Due to its user-friendly interface, everybody can use its features. But in the wrong hands, this could create a lot of problems.

Conch AI

Conch AI – An AI Text Generator You Need in 2024

If you are looking to elevate your research and learning skills, Conch AI is here for you. This AI tool takes your ideas and converts them into well-structured, grammatically correct masterpieces. Conch AI generates plagiarized free text 10 times, usually faster than any other AI text generator.


What is Conch AI?

Conch AI is an AI-powered tool that can help you write faster and better. It helps you craft humanize AI-written text, chat with any file, and many more. It is specifically designed to increase productivity in studying, researching, and writing. With the help of Conch, you can rewrite, paraphrase, autocomplete sentences, and do many more similar operations.


Conch AI Browser Extension

Conch AI can analyse any PDF file, document, or image and get the answers instantly. It comes with a Chrome extension which means it can be used anywhere at any time within your browser. This functions by answering your questions immediately that you might ask while you are working and don’t want to break the workflow. It is very useful for researchers, students, and professionals to improve their writing skills and work.

This tool is a heaven for researchers, as it helps them research and gather the information they require. For students, it can help to write academic articles, and scientific papers faster and better. For professionals, Conch can help them with resumes, job applications, cover letters, and many more without any AI detection.

Conch AI - Browser Extension

How does Conch AI work?

Conch AI works on the principle of augmenting with human capabilities instead of replacing them. For Example, it uses the context of a given file and the writing style of the writer to provide the best suggestion for their research. It uses the same writing style so that it cannot be detected by any AI.

Study tools can generate flashcards and notes from multiple sources including live recordings making it an invaluable resource for professionals and students. The enhanced tool focuses on refining AI-generated text making it sound less robotic and more human. Chat tools do a deep analysis of files and extract insights.

Conch AI

How to Use Conch AI?

To use Conch AI:

  • Head over to Conch AI website and click on Sign Up button. [https://www.getconch.ai/]
  • For Sign Up, complete the process by entering all necessary details.
  • You are ready to write your first essay.
  • Simply click on the write button and add a prompt for the essay.
  • While entering your prompt, it will predict and autocomplete your sentences. This will speed up your writing.
  • You can also upload a sample essay so Conch AI can copy your writing style.
  • Click on “Next” and your essay will be generated in no time.
  • If you want to cite a sentence, just highlight the sentence and click on “Cite” and add the citation.
Conch AI - Interdac


Paraphrasing Using Conch AI

You can also paraphrase the sentence, change the tone, or make it longer. To check the nature of the text, whether it is written with AI or by humans, click on the “Check for AI” button. It will highlight all text is AI-generated. You can rewrite that entire text to make it humanized by just clicking on “Humanize All”.

If you want notes or flashcards, click on “Study”. It will generate all notes and flashcards for you. For that, you can record your material or provide a YouTube link. In the “Chat” option, you can upload a file and ask all about that file. You will also get some prompt suggestions. The “Enhance” section will examine your essay and will provide suggestions for improvement.

Conch has helped multiple users to enhance their writing skills and skyrocket their grades. It is also very helpful in improving the writing skills of its users.


Pricing for Conch AI

Conch offers free plan as well as paid plans. You can choose one according to your requirements.

Conch Classic: Conch Classic is a free plan. It only provides 1000 words per month. You will have access to the Chrome extension and enhancer feature. You may also have to face some ads.

Conch Pro: Conch Pro will cost you $9.99 per month, and it comes with 10,000 words per month. Like the classic plan, you will also have access to Chrome extension, and enhancer, and you will also get a citation generator and will not face any ads.

Conch Limitless: Conch Limitless will cost you $19.99 and it will provide you with unlimited words. It also comes with a Chrome extension, an enhancer, a citation generator, no ads, and early access to new features. (pricing)

Conch offers a free way to get some tokens that can be used to pay for AI bypass.

If you like similar tools, you must check out AskYourPDF – Complete Guide


Frequently Asked Questions

  • Can I use Conch without creating an account?

Conch can be used without creating an account but it does not come with all features. You will only be able to access some of its features. It is recommended to create an account before using it.

  • Will Conch bypass Turnitin?

Yes, Conch claims that their anti-AI-detection technology is powerful enough to bypass any AI detector including Turnitin.

  • How to get Conch for free?

Go to the Conch website or download the Conch extension from Chrome extensions and use Conch Classic which is free to use.


Conclusion

In conclusion, Conch is a great AI tool that can evaluate your writing skills, enhance your research, write essays, and bypass AI detection. It can do all kinds of writing jobs for you and make your life easier. Just head over to Conch and start using it right away.

OpenAI's Sora - Feature Image

Here is Everything about OpenAI’s Sora that will Blow Your Mind – 2024

OpenAI’s Sora is just announced, and it is already breaking the internet with its incredible and unbelievable abilities. Before Sora, OpenAI also released ChatGPT that was a real shift of the way we use internet. Sora is here to do the same, by making us able to generate AI videos from text commands. In this article we will talk all about OpenAI’s Sora and how is it better than any other AI video generator out there.

What is OpenAI’s Sora?

Sora is the most recent product of OpenAI that is capable of generating the most realistic AI videos. Some other AI video generators like Pika and Stable Video Diffusion does the same but are not as good as the initial results of Sora are proving it to be. OpenAI’s Sora is able to generate a video from a text prompt as well as, can get an image as input and bring it to life.

Moreover, Sora can change or extend the background of a video, just like Photoshop AI can add a background to a picture. It can generate complex scenes with multiple characters and specific types of motion. It is so good at its job that people may deny that this video is generated by AI and may perceive it as real-life video shot by a camera.

How does OpenAI’s Sora work?

OpenAI’s Sora is a diffusion model like DELL.E and stable diffusion. Sora starts by generating random pixels that look like random noise and gradually generates an image by removing the noise with many steps and then combines those images and generates realistic videos.

OpenAI's Sora - Noises

OpenAI’s Sora works on a similar principle as large language models but instead of tokenizing text, it tokenizes visual patches to generate images. Sora is based on research of DELL.E and GPT models and uses a recapturing technique from DELL.E 3. While other models crop the training data, Sora is trained on native aspect ratio which is the reason behind OpenAI’s Sora results.

Why Sora is better than any other AI Video Generator?

Other AI video generators face limitations like generating high-definition videos, or flexible aspect ratios. Video duration is also a big limitation for other similar programs. Sora, however, comes with none of the mentioned limitations. It can generate high-definition, 60 fps videos. Also, the output videos by OpenAI’s Sora are realistic and can be up to a minute long. Sora can maintain cohesion and can generate videos in different aspect ratios which other AI video generators cannot do.

It can generate complex videos, multiple characters, specific types of motions, and accurate details of the subject and background which is nearly impossible for other AI video generators at this moment. You can see in the following video that a woman is walking in Tokyo city and a complex background and multiple characters. And yes, the video is totally generated by OpenAI’s Sora.

Drawbacks to Consider

Even though Sora is very powerful, it also comes with some drawbacks. At the end of the day, it is an AI model, and it is not perfect. Here are some of its imperfections.

  • Expensive: Sora requires a lot of GPU power to generate such videos. If an image is 1000*1000 pixels and 3 colors there are 3 million data points and to generate a 1-minute video with 60fps then there will be more than 10 billion data points. This makes OpenAI’s Sora very expensive.
  • Trouble in understanding: Sora may sometimes have trouble understanding and may not be able to make complicated things look real. For Example, someone took a bite from a cookie and it does not show bite marks on the cookie. Sora can also mix up right and left. You can see in the following video that a man is running backward on a treadmill which is not logical.

How to Access OpenAI’s Sora?

Unfortunately, Sora is not available for public use yet. It is only available for some selective users like filmmakers, visual artists, and designers to get their feedback. The reason behind this is, if Sora is made accessible for everyone, people will use it for their cause, harming others. However, at this point, OpenAI is taking several security steps to maintain the safety of Sora. It might take time, but OpenAI’s team claims to release Sora publicly only once they are sure its usage can’t be exploited for bad causes.

Sora has a detection classifier that detects misleading content. The detection Classifier will check every prompt and may reject some prompts that violate usage policies like violent, hateful, and adult content. OpenAI has also created robust image classifiers that review every single frame of video before presenting it to the user. They are also planning to implement the C2PA technique. C2PA gives publishers, consumers, and creators the ability to track the origin of any media.

Frequently Asked Questions

Here are some Frequently Asked Questions

  • What limitations we will have to face while using Sora?

Even though Sora is very powerful it still has some limitations. Sometimes it cannot render the complex sense. For Example in a video clapping hand start to act very differently because they could render properly. In another video when basketball touches the basket there is an explosion.

  • What will be the pricing model of Sora?

Since Sora is not available to the public yet, its price has not been announced, but it is highly unlikely that it will be free or cheap like any other OpenAI tool. It probably will be very expensive since it requires a lot of GPU and power.

Conclusion

OpenAI’s Sora is a very powerful AI video generator that can make very realistic videos from a prompt or an image. This will revolutionize the process of video creation and will make it fast, easy, and cheap.

Also Read: ChatGPT Blank Screen Issue – Reasons and 5 Solutions

using askyourpdf website on laptop

Here is How AskYourPDF Website Can Answer All Your Queries from a PDF Document

Have you ever wondered if AI can answer critical questions from a PDF? You can actually do that at the AskYourPDF website. This article is going to be all about that. We will see how you can make AI to answer your question from a PDF document. So let’s get started to discover how you can easily find answers to your questions from a PDF document by following a few simple steps.


What is the AskYourPDF Website?

As the name suggests, you can ask questions from a PDF using this website. In simple terms, you can upload your PDF document to this website. Once you have done that, the AI will analyze your uploaded document and will be able to answer all the questions you ask. This can really be helpful if you are not finding any help for queries from a PDF document. Let’s see how you can use the AskYourPDF website to let you keep going.


How to Use AskYourPDF Website

  • First of all, you need to visit the AskYourPDF website. You can either Google it or simply follow the attached link.
  • Once you are on the website, Click on “Get Started” to create a free account.


AskYourPDF Website - Getting Started

  • Sign up by providing the relevant information.
  • After signing up, you will have to verify your account from the email you provided.
  • You will have to open your email inbox and click on “Verify Account” in the most recent email.


AskYourPDF Website-Verify-Account


  • Once you have signed up, you will be redirected to a new page as demonstrated below.
  • Click on “Start Conversation”.


AskYourPDF-Website-First-Screen


  • You will now be redirected to the page where you can either upload your document or provide a link to the document.
  • Once the upload is completed, the AI will provide you with the initial information about the document. You can now start to ask your questions.


AskYourPDF Website-Conversation


Is the AskYourPDF Website Reliable?

I tried asking both simple moderate and complex questions. AskYourPDF website perfectly answered all the questions according to the document I provided. By the way, the document was a children story book which you can read yourself to get a better idea of the demonstrations below.

Limitations of AskYourPDF Website

Despite being useful, the AskYourPDF website comes with restricted services with a free account. However, you can upgrade to a premium subscription which provides you unrestricted useable access to the service. Here are the details of the premium subscription the AskYourPDF website offers.

AskYourPDF Website -Pro-Plans.jpg


Conclusion

AskYourPDF is a fabulous tool that uses the power of AI to solve your queries from a PDF document. You can simply upload a PDF document on the website and the website will be able to answer any type of the questions you ask.

Also Read: 5 Amazing Stable Diffusion Men Models You Should Try

Stable Diffusion Men Model Cover Photo

Here are 5 Amazing Stable Diffusion Men Models You Should Try

Stable Diffusion is a popular text-to-image AI model that can turn your generative thoughts into actual images. One of the features that sets it apart from its competitors is it comes with 1000+ custom models which you can use to boost your creativity. In this blog, we will be discussing 5 best Stable Diffusion men models which are perfect if you are looking to generate male characters. We will also discuss the workings of each model in detail. So let’s get started.


Set Up Stable Diffusion WebUI

The first thing you need to experience Stable Diffusion men models is Stable Diffusion WebUI. Following a few simple steps, you can install Stable Diffusion on your own machine. Once you have installed Stable Diffusion on your PC, you can try these Stable Diffusion men models for ultimate creativity and fun.


Stable Diffusion Men Models

Here is the list of the 5 Best Stable Diffusion Men Models


BlueBoys_2D

Stable Diffusion Men Model Blue Boys 2D

As the name suggests, this model creates 2D anime-style male images according to your input prompts. The model focuses on simple, clear, and flat 2D style designs with vibrant and clear colors. If you are a 2D anime fan, this model is going to be a good treat for you.

Here are a few recommended settings for BlueBoys_2D to best work for you. Keep sampling method of Eular a / DPM++ SDE Karras, a clip skip of 2, and Hires. fix upscaler of R-ESRGAN 4x+Anime6B. Additionally, a CFG scale of 7 to 11 and a VAE of vae-ft-mse-840000-ema-pruned / kl-f8-anime2 will work best in most of the cases.


The Three Kingdoms

Stable Diffusion Men Model The Three Kingdoms

The Three Kingdoms is one of the best Stable Diffusion men models for those who love fairy tale, ancient, king-type characters. The model will provide you with an output of characters that are similar to classic villains or heroes.

One of the best parts is, that The Three Kingdoms is being updated on a regular basis. If you are not satisfied with the results of your initial attempts, you can always try later. Additionally, the model doesn’t need any trigger words, which makes it really user-friendly.


PastelBoys_2D

Stable Diffusion Men Model Pastel Boys 2D

PastelBoys_2D is another powerful Stable Diffusion model which can amaze you with its results. It can be a fantastic utility if you are looking to generate a handsome anime male character. The model is better than its previous version, however, need some improvements in a few areas. Overall the model performance is impressive.

The best settings for the model to generate stunning outputs are as follows. Sampling method – Eular a / DPM++ SDE Karras, Clip skip – 2, Hires.fix upscaler – R-ESRGAN 4x+Anime6B, CFG Scale – 7~9, and VAE – vae-ft-mse-840000-ema-pruned / kl-f8-anime2.


Pretty Boys

Stable Diffusion Men Model Blue Pretty Boys

The Pretty Boys is the first realistic LORA Stable Diffusion men model which can help you create realistic male models. The AI model is trained to generate handsome faces without a beard. You can control the output of the model by using terms like Caucasian, Black, Asian, or Indian.

The Pretty Boys Stable Diffusion model is trained on Stable Diffusion 1.5. You can get better results if you use VAE sd-vae-ft-mse-original. You will need to update the WebUI by using git pull to use LORA’s in auto1111. It is worth noting the LORA file should be copied to stable-diffusion-webui/models/lora directory. The weight should be adjusted according to the instructions as well.


Refdalorange

Stable Diffusion Men Model Refdalorange

Refdalorange can create the male characters with a perfect balance between 2D and 3D design. Although the model is trained to generate male characters, it can also generate female characters pretty well. The model uses orangemix.pt VAE, which is very effective for generating high-quality character designs.

The feature that sets Refdalorange apart from other Stable Diffusion men models is it can generate male characters in almost every situation. You can create your character as a warrior, as a scholar, or anything you want.


Conclusion

Stable Diffusion is an ocean of amazing output production ranging from imaginative sceneries to realistic human characters. The AI model offers tons of models which can be used for custom generation purposes. If you are looking to generate some male characters, you got tens of Stable Diffusion men models. These models range from 2D to 3D to realistic male characters. Each model is discussed with its pros and cons in the blog.

Here is How to Download and Install Stable Diffusion’s Anything V4.5 Model

If you are into Stable Diffusion models, you must be familiar with one of the best Stable Diffusion anime models, Anything V3. You will get to know some insights about the model as we proceed further in the blog. Moreover, you will learn what is Anything V4.5 Stable diffusion model, how to download it, and install on your machine. If you love anime, you are in for a treat. So let’s get started!


The Origin of Anything V3 and Anything V4.5 Stable Diffusion

Anything V3 model is famous for its fantastic output in the anime genre. It is considered one of the best anime Stable Diffusion models to exist. Surprisingly, very few people know where it came from. Someone from China anonymously launched it over the internet. Despite its popularity, no one claimed to be its creator.

Building on this, someone took Anything V3 a step further, leading it to Anything V4, and eventually Anything V4.5 Stable Diffusion. So it’s obvious, Anything V4.5 Stable Diffusion wasn’t developed by the creator of Anything V3. Instead, it is developed by someone who used the existing source code of Anything V3.


Anything V3 Vs Anything V4.5 Stable Diffusion

Here is a demonstration of how both models are practically different from each other. While they share similarities, you will notice more details in the Anything V4.5 model.

anything v3
Anything V3 – PC: Pirate Diffusion

anything v4.5 stable diffusion
Anything V4.5

Anything V3 A
Anything V3 A

Anything V4.5 A
Anything V4.5 A

How to Download and Install Anything V4.5 Stable Diffusion

To download Anything V4.5 Stable Diffusion, you have to follow these simple steps.

  • Got to Hugging Face and Login.
  • If you don’t have an account, sign up.
  • Search for “Anything V4.5” in the search bar.
  • Choose the “Airic/Anything-V4.5”

Airic/Anything-V4.5 Stable Diffusion

  • Head to Files and Versions Section.
  • Download your preferred model format (.ckpt or .safetensor).
  • Check out the difference between the model formats here.
  • Click here to check out the step-by-step guide on how to install the model on your PC.

Conclusion

Anything V3 is considered to be one of the best anime Stable Diffusion models ever. It was originally launched by someone in China anonymously. Taking it to the next step, the Anything V4.5 Stable Diffusion model was launched recently. Some of the differences between the two are demonstrated in the blog. Additionally, you can download and install Stable Diffusion on your machine by following few simple steps shared in the blog.

Step by Step Guide to Install Stable Diffusion on Windows 10

Are you tired of using Stable Diffusion on Discord? Do you want to push your creativity limits? Well, you are in the right place. In this blog, we will learn how to install Stable Diffusion on Windows 10 and 11. We will cover the topic in detail and will go through all the steps one by one. So without waiting any further, let’s get started.


System Requirements to Install Stable Diffusion on Windows 10

To run Stable Diffusion on your PC, your system needs to match the following requirements:

  • Any good AMD or Intel CPU.
  • A minimum of 16 GB of RAM.
  • At least 256 GB SSD.
  • At least 10 GB of free disk space.
  • A GeForce RTX GPU with a minimum of 8 GB of GDDR6 memory.


What you will need?

Here is the list of things you will need to install Stable Diffusion on Windows 10.


Hugging Face Account

First of all, you will need an account on Hugging Face. You can create one for free by simply clicking here and entering the relevant information.


GitHub Account

The second thing you will need is an account on GitHub. You can create it for free too. Just click here and sign up by following the on-screen instructions.


Stable Diffusion Models

You will need to download the Stable Diffusion model from Hugging Face. For that, head to the Hugging Face, and in the search bar, type “stable diffusion”. You will see different models.

how to install stable diffusion on windows 10

Each of them is a bit different from each other. You can discover details about each model on the Internet. However, for this tutorial, I installed the Stable Diffusion v1.4 Original model.

You can search for the same model on hugging face, or simply click here. Under “Download the weights” click on “sd-v14.ckpt” and it should start downloading the model.

how to install stable diffusion in windows 10

Git for Windows

The next thing you will need is a software called Git for Windows. If you are familiar with Linux OS, you must have heard the command “git clone”. That is exactly what this software is going to do for us in Windows.

To download the software, simply click here. Click on the Download button and the software should start downloading.

Once the software is downloaded, double-click on the setup to install it and complete the installation process by following the on-screen instructions.


Python

The next thing you will need to install Stable Diffusion in Windows 10 is Python programming language. For that, click here and scroll down until you see “Files”. Click on “Windows Installer | Windows | Recommended” as shown below.

how to install stable diffusion on windows 10

It will start downloading Python for you.

Once the downloading is completed, double-click on the Python setup file and install it by following the on-screen instructions.

That was all we needed to install Stable Diffusion on Windows 10.

Now let’s begin installing Stable Diffusion.


Location to Install Stable Diffusion on Windows 10

First of all you need to define the location where you want to install the Stable Diffusion. Remember, you will need at least 10 GB of free space to install the software. It is highly recommended to install it in an SSD for better performance.

Once you have decided where to install Stable Diffusion, simply create a new folder in that location. You can name it whatever you want. For this tutorial, we will name it “AI – Stable Diffusion”. Now copy this folder


Changing Directory

Now open Git for Windows and type cd[paste]. Replace Paste with the directory of the “AI – Stable Diffusion” folder by right-clicking and selecting “Paste”. It will change Git for Windows directory to the folder where we want to install Stable Diffusion in Windows 10.

how to install stable diffusion on windows 10


Cloning Stable Diffusion in Windows 10

Now, you will need to clone Stable Diffusion 1111 in your Windows. For that, visit this link and click on “Code”. You should see the “Copy” button next to the code. Simply click this button, or just copy the code directly from here  https://github.com/AUTOMATIC1111/stable-diffusion-webui.git.

Now go back to Git for Windows and issue this command  “git clone [code]”. Replace [code] with the code you just copied.

Hit Enter. It will take a minute or so. Wait for it to be completed.


Putting in Checkpoints

Now copy the sd-v14.ckpt you downloaded earlier and head to the “AI – Stable Diffusion” folder. Navigate to the path “Location\AI - Stable Diffuion\stable-diffusion-webui\models\Stable-diffusion”.

In this folder, you will see a text file saying “Put Stable Diffusion checkpoints here”. Paste the file you copied earlier.


Downloading Torch

Navigate to the path “Location\AI - Stable Diffuion\stable-diffusion-webui” and scroll to the end until you see this file called “webui-user.bat”.

how to install stable diffusion on windows 10

Double-click this file and it should initiate the download. Wait for it to be completed.

how to install stable diffusion on windows 10


Here You Go!

Once that’s completed, you should see “Running on Local Machine” and a web address next to it.

How to Install Stable Diffusion on Windows 10

Simply copy the address and paste it into a new tab in your browser.

Bingo! You are inside the Stable Diffusion Web UI.

You can generate anything that you imagine without any restrictions! There are a lot of settings that you can play around to find the best for you.

If you are looking for amazing prompts to get started with, here they are. Additionally, if you run into any error while running Stable Diffusion on your PC, you can find a solution here. If you encounter a “Cuda out of Memory Error”, here are 7 ways to resolve that error.


midjourney vs stable diffusion

Midjourney Vs Stable Diffusion – 10 Differences to Make You Choose One

Midjourney and Stable Diffusion prominently emerged into the landscape of Artificial Intelligence Image Generation in mid-2022. Both aimed to simplify the process of image generation from natural language. In this article, we will discuss Midjourney vs Stable Diffusion. How both are different and which one could be a better choice for you. I will also share a step-by-step guide for getting started on both of them. So without waiting anymore, let’s get started.


Midjourney Vs Stable Difusion Key Differences and Comparison

Here are the key differences comparing both image-generative AI models.


Midjourney Vs Stable Diffusion: License Model

Midjourney works as a business-for-profit organization. It was launched by a private team of 11 people back in 2022. It uses a proprietary machine-learning model.

On the other hand, Stable Diffusion was launched by a startup company, Stability AI. So it does not operate as a private business or profit organization. Moreover, it works under an open-source license.


Midjourney Vs Stable Diffusion: Medium of Usage

To use Midjourney, you need to have a Discord account. It is the only way to access this AI image generative model.

Contrarily, Stable Diffusion, can either be accessed through their Discord server or can be installed and used on your own machine if it meets the system requirements. It can also be used in many online and offline apps.


Midjourney Vs Stable Diffusion: Pricing Models

As it works for profit, Midjourney offers a paid model. You need to pay some bucks to generate images from this AI image model. It is worth noting that even with the paid Midjourney subscriptions, you get a limited amount of image generations. High-tire plans may offer unlimited generations under relaxed hours.

However, you can use Stable Diffusion totally free of cost. Whether you are using it in its discord server, or on your own machine, you can generate unlimited images. But using Stable Diffusion for free may require some effort.


Midjourney Vs Stable Diffusion: Custom Models

Midjourney offers a limited number of custom models which you can use online.

On the other hand, Stable Diffusion comes with 1000+ online models which you can download and run on your PC, totally free of cost.


Midjourney Vs Stable Diffusion: Ease of Use

Midjourney may seem to be easier to use for its small number of customization buttons.

Nevertheless, Stable Diffusion offers advanced features and customizations, once you have mastered its usage.


Midjourney Vs Stable Diffusion: Art Models

Midjourney offers anime based art model which can be used using the ” –niji ” parameter.

However, Stable Diffusion offers tens of different art models in its online variant. Moreover, its downloadable custom models are trained with different styles which can be utilized to generate different art model images.


Midjourney Vs Stable Diffusion: Image Prompts

In Midjourney, you can use images as a part of your prompt. The image generative model will consider both your text and image prompt to generate the desired results.

Stable Diffusion, however, only accepts text-based commands at of writing of this article.


Midjourney Vs Stable Diffusion: Censorships

Midjourney strictly prohibits the generation of explicit content. Your account can be banned without warning if your prompts contain explicit content or aggressive language.

Stable Diffusion follows similar guidelines in their online servers. However, you may have some flexibility in working around these limitations when using custom models.


Midjourney Vs Stable Diffusion: Image Quality

Now let’s look at some real-world examples by comparing the images generated with the same command, to help you choose between the two models.

For the following example, the prompt was “a large white serpentine dragon perched atop a rock watching the horizon”. You can already see the quality difference between both of the image generative model’s results.

Picture Credit: Android Authority


In our second example, realism clearly popped up in the results of Midjourney. If you are looking for more realistic images, Midjourney is your way!


Picture Credit: Android Authority


Midjourney Vs Stable Diffusion: How to Start?

If you have chosen between the two models, here is how to start using your desired one.

For both AI image models, you need to have a Discord account. If you don’t already have a Discord account, click here to create one.

Getting Started with Midjourney

  1. Join their discord server by clicking here.
  2. Click Accept Invite.
  3. To subscribe to a Midjourney plan, go to the “newbies” channel
  4. Type “/subscribe” in the text box and hit enter.
  5. Choose your desired pricing plan and click subscribe.
  6. Start generating your first image by entering “/imagine [your prompt here]


Getting Started with Stable Diffusion

  1. Join the Discord server by clicking here.
  2. Click Accept Invite
  3. Navigate to any of the “bot” channels.
  4. Start generating your first image by entering “/dream[your prompt here]

Conclusion

Midjourney and Stable Diffusion are two prominent players in the game of AI image generation. Yet both have different characteristics. Midjourney works as a business for-profit organization, while Stable Diffusion works as an open-source model. Midjourney can only be accessed online while Stable Diffusion can be accessed online or on your own machine. Midjourney offers paid plans for utilizing its image generation capabilities, while Stable Diffusion is totally free of cost. Both AI image generative models produce totally different image quality and concepts. Consider all the differences before choosing one.

Hope you enjoyed this Midjourney Vs Stable Diffusion comparison. Don’t forget to check out the other AI stories we covered.

Generate these Beautiful QR Code Arts in Few Simple Steps

If you’re here, I assume you want to generate a QR code just like the one you saw above. Am I right? Well, you’ve come to the right place. In this article, we will explore how you can create QR code art without stable diffusion for yourself or your business.

QR code arts are typically best generated using Stable Diffusion. But you don’t need to worry if you don’t have a powerful machine or you can’t use Stable Diffusion ControlNet. In the future, I’ll also cover how to generate these QR code arts with Stable Diffusion. But for today, let’s focus on learning how you can generate these beautiful and scannable QR code arts without Stable Diffusion. All you need for this tutorial is an active internet connection and a lot of excitement. So let’s get started!


Why QR Code Art?

It’s pretty obvious. The classic black and white QR codes are dull and outdated, while these new QR code arts are visually interesting. When someone will come across your unique QR code for the first time, it will undoubtedly catch their attention. They’ll be curious to scan the code and discover what lies behind it. This will eventually increase the chances of them visiting your pages.


Limitations of QR Code Art

Before we proceed further, let’s consider a few limitations you will have to face using this method.


Quality of the QR Code Art

As mentioned earlier, today we will be generating QR code art without Stable Diffusion. So the quality may not be as high as what you would achieve with Stable Diffusion. However, it will still be good enough to attract attention.


Limited Trail

Since this method is free, it allows you to generate a limited number of QR code arts. Nevertheless, I assure you that these free trials will be more than sufficient to create something impressive for yourself or your business. In other words, you will get tons of free QR Code Arts with one account.


Inconsistency

Since we will use a relatively new AI model, you may witness inconsistency in its behavior. You might not find exactly what you’re looking for on your first attempt. However, you can play around with different experiments and explore different options to achieve your desired results.


Generating QR Code Art without Stable Diffusion

Now let’s see how you can actually create a beautiful QR code art without stable diffusion. You simply need to follow this step-by-step guide to bring your desired QR code design to life.


Before we proceed, here are the examples of what I generated using this method. You can scan these codes for your satsifcation.

QR Code Art without Stable Diffusion


Step 1: Generate a QR Code

  • Visit the Quick QR Art website. You can either search for it or click here to access it directly.
  • On the website, you’ll find several options for your QR code art, including Link, Text, Email, Location, Phone, SMS, WhatsApp, Skype, Zoom, Wifi, V-Card, Event, PayPal, and Bitcoin. Choose the option according to your needs.

QR Code Art Generating Website

  • For this tutorial, I will be selecting the “Link” option to create a QR for my website.
  • Similarly, you can enter the relevant information for your QR Code. The website will automatically generate one for you.
  • You can now customize the colors, design, logo, frame, and other options to personalize your QR code. Keep in mind that it’s still a simple QR code at this stage.

QR Code Art without Stable Diffusion

  • Once you get your desired output, click the “Save” button below the QR code.
  • Under the save button, you’ll see tiny buttons indicating save as PNG, SVG, and PDF. Choose the first tiny button to save the QR code as a PNG file on your computer.

QR Code Art without Stable Diffusion


Step 2: Join the Discord Server

  • To proceed with this step, you’ll need a Discord account. If you don’t have one already, you can sign up here.
  • Scroll to the top of the Quick QR Art website and look for the “Join Beta Now >>” button.

Quick QR Art without Stable Diffusion

  • Click on it, and it will take you to the Discord server.


Step 3: Create the QR Code Art

  • Inside the Discord server, you will see a “paste-bin” channel on the left side.
  • Go to this channel and at the beginning of the text box, you’ll see a “+” icon.
  • Click on the “+” icon and select “Add Media.”

Quick QR Art without Stable Diffusion

  • Browse your PC/mobile for the QR code you previously saved as a PNG file. Select the file and upload it into the Paste-bin channel.
  • Once the QR code is uploaded, right-click on it and choose “Copy Message Link.”

Quick QR Art without Stable Diffusion

  • Move to any of these channels called “pixelml-bot” and start typing your command.
  • Start with typing “/generate” and press the space bar.
  • The command will ask you to choose a preset you would like to use for your QR Code Art. Select the one to your satisfaction. Here is a handy preset guide to assist you in choosing one. I chose “ultra-realism” for this tutorial.
  • Next, you need to enter a prompt. Simply think of what you want for your QR Code Art and describe it in words. Here is a demonstration:

Quick QR Art without Stable Diffusion

  • In the URL section, paste the message link copied earlier within the Discord server.
  • Now press enter, sit back, and let the AI do its magic.


Parameters:

You can use these parameters to further customize your QR Code Art.


QR Weight (–qrw):

This parameter determines to what degree the QR Code is prominent in your final image. The default value for this parameter is 0.8, but you can adjust it between 0 and 2 as per your satisfaction. Higher values for this parameter will make the QR code more prominent however it may compromise the art behind the code.


Balance Steps (–steps):

This parameter determines the number of times the image is sampled during the generation process. The higher the number of steps the higher the art is prominent in the final image. However, the higher values of this parameter will compromise the scannability of the QR code. The default value is 16, but you can set it between 10 and 20 based on your preference.


Is QR Code Art Scannable?

As mentioned earlier, increasing the balance steps can compromise the scanability of the QR code art. Similarly, other factors can also impact the scalability of the code. Overall the QR codes are scannable. You can scan them yourself to check if they work properly. Here are some results I obtained:

Quick QR Art without Stable Diffusion

It’s worth noting that in case you are trying to scan these QR code arts with iPhone’s Camera app, it may not work. You will need a dedicated QR Scanner for these to work. You can use Google Lens as well.


Conclusion

As AI continues to evolve, it’s no more limited to text-based prompts. AI is making its way into the world of visuals now. Following this, QR Code Arts have become quite trendy recently. You must have seen them on the Internet. If you want to generate one for yourself or your business but don’t have a powerful machine to run a stable diffusion control net, this blog should come in handy for you. In this blog, we have discussed how you can generate QR code art without stable diffusion. Hopefully, this comprehensive guide will be helpful for you.
If you want more tutorials on AI, you can explore the category here.

Here is How to Lock Your WhatsApp Chats for Added Privacy

Meta has just announced an exciting feature for their largest instant messaging platform Whatsapp. This feature is called “WhatsApp Chat Lock”. As the name suggests, this feature will help you add an additional layer of security to your intimate conversations.

In this comprehensive guide, we will explore how you can activate the WhatsApp Chat Lock feature. Additionally, we will see why this feature is an effective way to safeguard your privacy when someone else is using your phone.


What is WhatsApp Chat Lock?

WhatsApp has this feature of locking the entire app with your biometrics for a long time. However, if you want to lock specific chats individually, WhatsApp Chat Lock comes into play. This feature enables you to keep your most personal and sensitive chats away from prying eyes.

If you are confusing this feature with archiving chats, you are wrong. Archiving merely hides the chats, while the Chat Lock relocates the selected chats to a dedicated secure folder, which can only be unlocked with your biometrics. Consequently, even if someone gains access to your unlocked WhatsApp, they won’t be able to access those specific locked chats. Isn’t it exciting? Let’s explore more.


Additional Features of WhatsApp Chat Lock

This feature is not just about locking the chats. It offers more! When a chat is locked, any media content, such as photos and videos shared in that specific chat won’t be saved to your phone’s gallery. This acts as an additional layer of privacy which ensures that the sensitive media files remain hidden and protected.

Additionally, the message notifications for locked chats are hidden. It prevents any third party from reading the content of the message from hidden chat. So even if your device is unlocked, the content of locked chats will remain hidden and secure.


Limitations of WhatsApp Chat Lock

While WhatsApp Chat Lock acts as an outstanding additional privacy layer, the limitations of this feature must not be neglected. Currently, the feature is only functional for your primary WhatsApp device. This means that the same chat will not be locked on your linked devices.

Moreover, you can currently unlock the secured chats with your PIN, password, or biometric authentication. So it’s crucial that you keep these biometrics/codes secure so that no one can have unauthorized access to your WhatsApp chats.

It’s notable that Meta acknowledges these limitations and has plans to introduce future enhancements to the feature. In the future, we may be able to set a unique password or PIN for locked chats.


How to Activate WhatsApp Chat Lock

Follow this simple step-by-step guide to take your WhatsApp privacy to next level!

  • After opening WhatsApp, navigate to the specific chat you want to lock.
  • Tap the contact name to access the chat info screen.
  • Scroll down and select the “Chat lock” option under “Disappearing Messages”.

WhatsApp Chat Lock - Name Navigation

  • Enable the “Lock This Chat with Touch ID” toggle.
  • A message will pop up informing you that this chat will not be locked on your linked devices. Click OK.

WhatsApp Chat Lock - Toggle On

  • Confirm your identity by authenticating your biometrics or codes.
  • A message will appear saying “This Chat is Now Locked”.
  • Enjoy peace of mind when someone else is using your phone!


How to Deactivate WhatsApp Chat Lock

  • Go to the Locked Chats folder at the top of your WhatsApp Chats screen.

WhatsApp Chat Lock - Locked Chats Folder

  • Authenticate your identity with biometrics or passcodes.
  • Open the Chat you want to deactivate the WhatsApp chat lock for.
  • Click on the contact name.
  • Scroll down and find Chat Lock
  • Toggle off Lock this Chat with Touch ID
  • Confirm your identity by authenticating biometrics.
  • The chat is now unlocked.


Conclusion

Meta just announced the WhatsApp Chat Lock feature. This is a powerful tool that enables users to take full control of their privacy. Using this feature, you can protect sensitive chats by individually locking them. You can follow the step-by-step guide provided in this article and you will be able to activate and utilize the WhatsApp Chat Lock feature. This feature not only hides conversations but also makes sure that the media content from that specific chat is not saved to your phone’s gallery. Additionally, this feature hides the message notification content for a locked chat. You don’t need to compromise your peace of mind anymore.

Hope you enjoyed the article. If you are someone who is looking for extra WhatsApp privacy, here is another blog for you. Learn how you can blur sensitive content when using WhatsApp Web.

Scroll to Top